Why
Why not? In reality, I always wanted to play with clustering, originally with proxmox and ceph, but I never had enough hardware to do so. I do however have a proxmox node with enough ram that I can host multiple lightweight nodes.
Docker swarm is lightweight enough that I can virtualize the entire cluster on my single proxmox host. While this isn’t fault tolerant like a cluster across multiple nodes, it does mean I can reboot cluster nodes for kernel updates and maintain my uptime. I also am able to add additional docker swarm nodes on separate hardware if I get additional hardware, and there is the benefit of having the cluster load balance itself for which software is running on which node.
Benefits
Each node in the cluster is identical, each can be replaced by following the exact same process and while I don’t have automated deployment of new nodes, they are still closer to cattle than many of my other virtual machines. Due to the goal of replicated storage between the nodes, I should also be able to take a single node and rebuild the entire cluster if needed, since it would have the entire clusters configuration.
Needs
I’ll be demonstrating on a small cluster with 3 nodes, each of them a master. This does mean that we always need at least two running nodes for quorum, however this also means that we can reboot or replace any individual node and the cluster remains viable. Each of these will be running on Ubuntu Server 18.04. So for that, you’ll need:
- Three running and updated instances of Ubuntu Server 18.04.
- A user with sudo privileges.
That’s all you need to make this work.
Before doing anything, lets get these boxes up to date
sudo apt-get update
sudo apt-get dist-upgrade -y
If needed, reboot for kernel updates
Network Setup
Add some stuff about static IPs
We now need to map our IP addresses in /etc/hosts. Do this on each machine. Issue the command:
sudo nano /etc/hosts
In that file (on each machine), you’ll add something like this to the bottom of the file:
192.168.1.123 docker-node01
192.168.1.124 docker-node02
192.168.1.125 docker-node03
Make sure to edit the above to match your IP addresses and hostnames.
Save and close the file.
Docker Swarm Setup
If you haven’t already done so, you need to install and deploy the Docker Swarm. On each machine install Docker with the command:
sudo apt-get install docker.io -y
Start and enable Docker with the commands:
sudo systemctl start docker
sudo systemctl enable docker
Add your user to the docker group (on all machines) with the command:
sudo usermod -aG docker $USER
Issue the following command (on all machines) so the changes take effect:
sudo newgrp docker
Next, we need to initialize the swarm. On the master issue the command:
docker swarm init --advertise-addr MASTER_IP
Where MASTER_IP is the IP address of the master.
Once the swarm has been initialized, you’ll need to get the manager join token using the following command, then execute the join command on all remaining nodes.
docker swarm join-token manager
docker swarm join --token SWMTKN-1-09c0p3304ookcnibhg3lp5ovkjnylmxwjac9j5puvsj2wjzhn1-2vw4t2474ww1mbq4xzqpg0cru 192.168.1.123:2377
Copy that command and paste it into the terminal window of the nodes to join them to the master.
And that’s all there is to deploying the swarm.
GlusterFS
You now need to install GlusterFS on each server within the swarm. First, install the necessary dependencies with the command:
sudo apt-get install software-properties-common -y
Next, add the necessary repository with the command:
sudo add-apt-repository ppa:gluster/glusterfs-3.12
Update apt with the command:
sudo apt-get update
Install the GlusterFS server with the command:
sudo apt install glusterfs-server -y
Finally, start and enable GlusterFS with the commands:
sudo systemctl start glusterd
sudo systemctl enable glusterd
Probing the Gluster Nodes
Now we’re going to have Gluster probe all of the nodes. This will be done from node 01. I’m going to stick with my example of with 3 nodes total in the cluster. Before you issue the command, you’ll need to change to the superuser with:
sudo -s
If you don’t issue the Gluster probe command from root, you’ll get an error that it cannot write to the logs. The probe command looks like:
gluster peer probe docker-node02; gluster peer probe docker-node03;
Make sure to edit the command to fit your configuration (for hostnames).
Once the command completes, you can check to make sure your nodes are connected with the command:
gluster pool list
You should see all nodes listed as connected
administrator@docker-01:/$ sudo gluster pool list
UUID                                    Hostname        State
48ea5f6a-fb12-4a34-a957-a051bc96ed67    bot-docker-02   Connected
ab4a7508-9e53-4118-84ef-d63f41dbba3a    bot-docker-03   Connected
a92c8669-441f-4a67-8a2f-b5d5a7e5cc27    localhost       Connected
Exit out of the root user with the exit command.
Create the Gluster Volume
Let’s create a directory to be used for the Gluster volume. This same command will be run on all machines:
sudo mkdir -p /gluster/volume1
Use whatever name you want in place of volume1.
Now we’ll create the volume across the cluster with the command (run only on the master):
sudo gluster volume create staging-gfs replica 3 docker-node01:/gluster/volume1 docker-node02:/gluster/volume1 docker-node03:/gluster/volume1 force
This creates a gluster cluster with each node having a full set of the data (3 replicas), using each of the nodes for the cluster. All the data in the gluster volume will be replicated between the nodes (in my case, over the 10g vswitch in proxmox).
Start the volume with the command:
sudo gluster volume start staging-gfs
The volume is now up and running, but we need to make sure the volume will mount on a reboot (or other circumstances). We’ll mount the volume to the /mnt directory. To do this, issue the following commands on all machines:
sudo -s
echo 'localhost:/staging-gfs /mnt glusterfs defaults,_netdev,backupvolfile-server=localhost 0 0' >> /etc/fstab
mount.glusterfs localhost:/staging-gfs /mnt
chown -R root:docker /mnt
exit
To make sure the Gluster volume is mounted, issue the command:
df -h
You should see it listed at the bottom.
localhost:/staging-gfs 32G 11G 20G 37% /mnt
You can now create new files in the /mnt directory and they’ll show up in the /gluster/volume1 directories on every machine.
Using the new Gluster Volume with Docker
At this point, you are ready to integrate your persistent storage volume with docker. Say, for instance, you need persistent storage for a MySQL database. In your docker YAML files, you could add a section like so:
 volumes:
   - type: bind
     source: /mnt/staging_mysql
     target: /opt/mysql/data
Or in the case that you need an Inspircd server with persistent storage for the configuration:
services:
  inspircd:
    image: inspircd/inspircd-docker
    volumes:
      - /mnt/data/Inspircd:/inspircd/conf/
Since we’ve mounted our persistent storage in /mnt everything saved there on one docker node will sync with all other nodes.
And that’s how you can create persistent storage and then use it within a Docker Swarm cluster. Of course, this isn’t the only way to make persistent storage work, but it is one of the easiest (and cheapest). Give GlusterFS a try as your persistent storage option and see if it doesn’t work out for you.
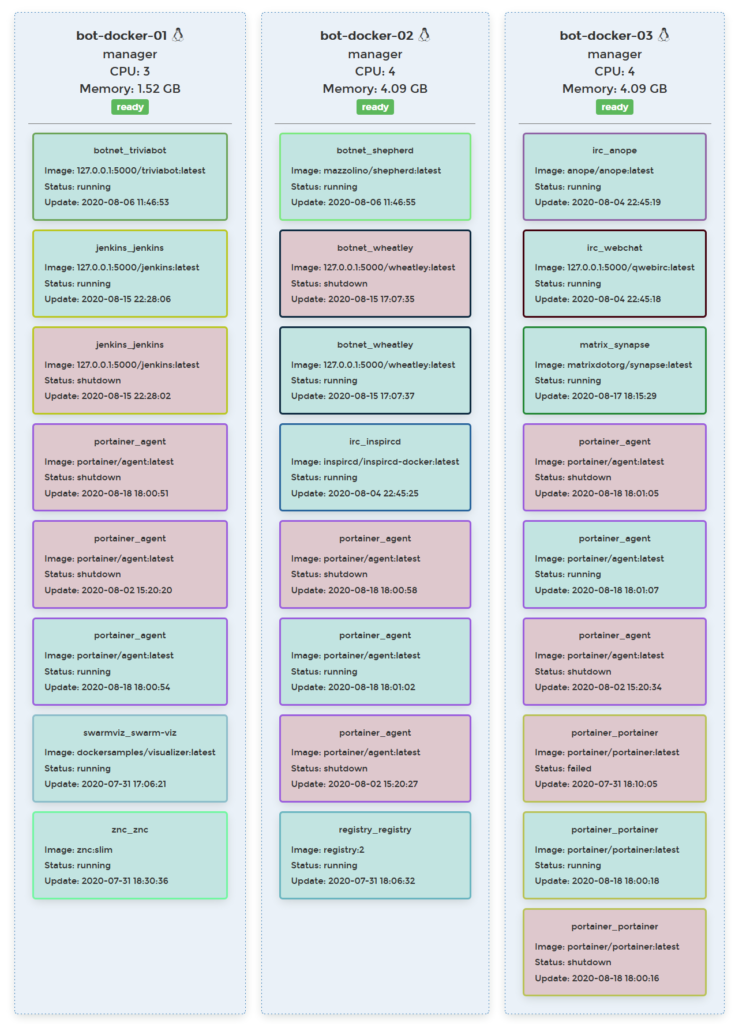
Add a few services and see how it works. My nodes are mostly 4GB ram and 64GB storage which is running everything below.