Like many, I had issues with sqlite database corruption on Unraid. I found while researching it that it had to do with file locks in the fuse file system unraid uses to merge disks. I found the best way to circumvent this is to use the cache disk for those databases and map them directly. My docker mappings now point to /mnt/cache/share instead of going /mnt/user/share. This solved the issue better than the 6.8.0rc5 fixes. This avoids the system in question completely and solved the stability issues for me.
NextCloud Setup: Joplin
Joplin was relatively simple to setup on NextCloud. The only difficulty is setting the folder it should run out of. This is done via the webdav url that Joplin connects to. An example is shown below on how to get this going.
https://nextcloud.rapternet.us/remote.php/dav/files/<username>/<path to Joplin directory>
The webdav url just needs your username and the path it should utilize, in my case I just have Joplin setup to go to Documents/Joplin. This would go in the tag above, just add a username and it’s done. This does have to be setup the same way on all Joplin clients or you will end up with files missing from one or another, though they will all be in NextCloud.
NextCloud Setup: Desktop Client
Setup is easy enough IF http does not redirect to https. The authentication mechanism for the NextCloud desktop client for some reason doesn’t work when http is redirected to https (ex: in the way let’s encrypt sets it up). With the right server setup after that, everything is straight forward.
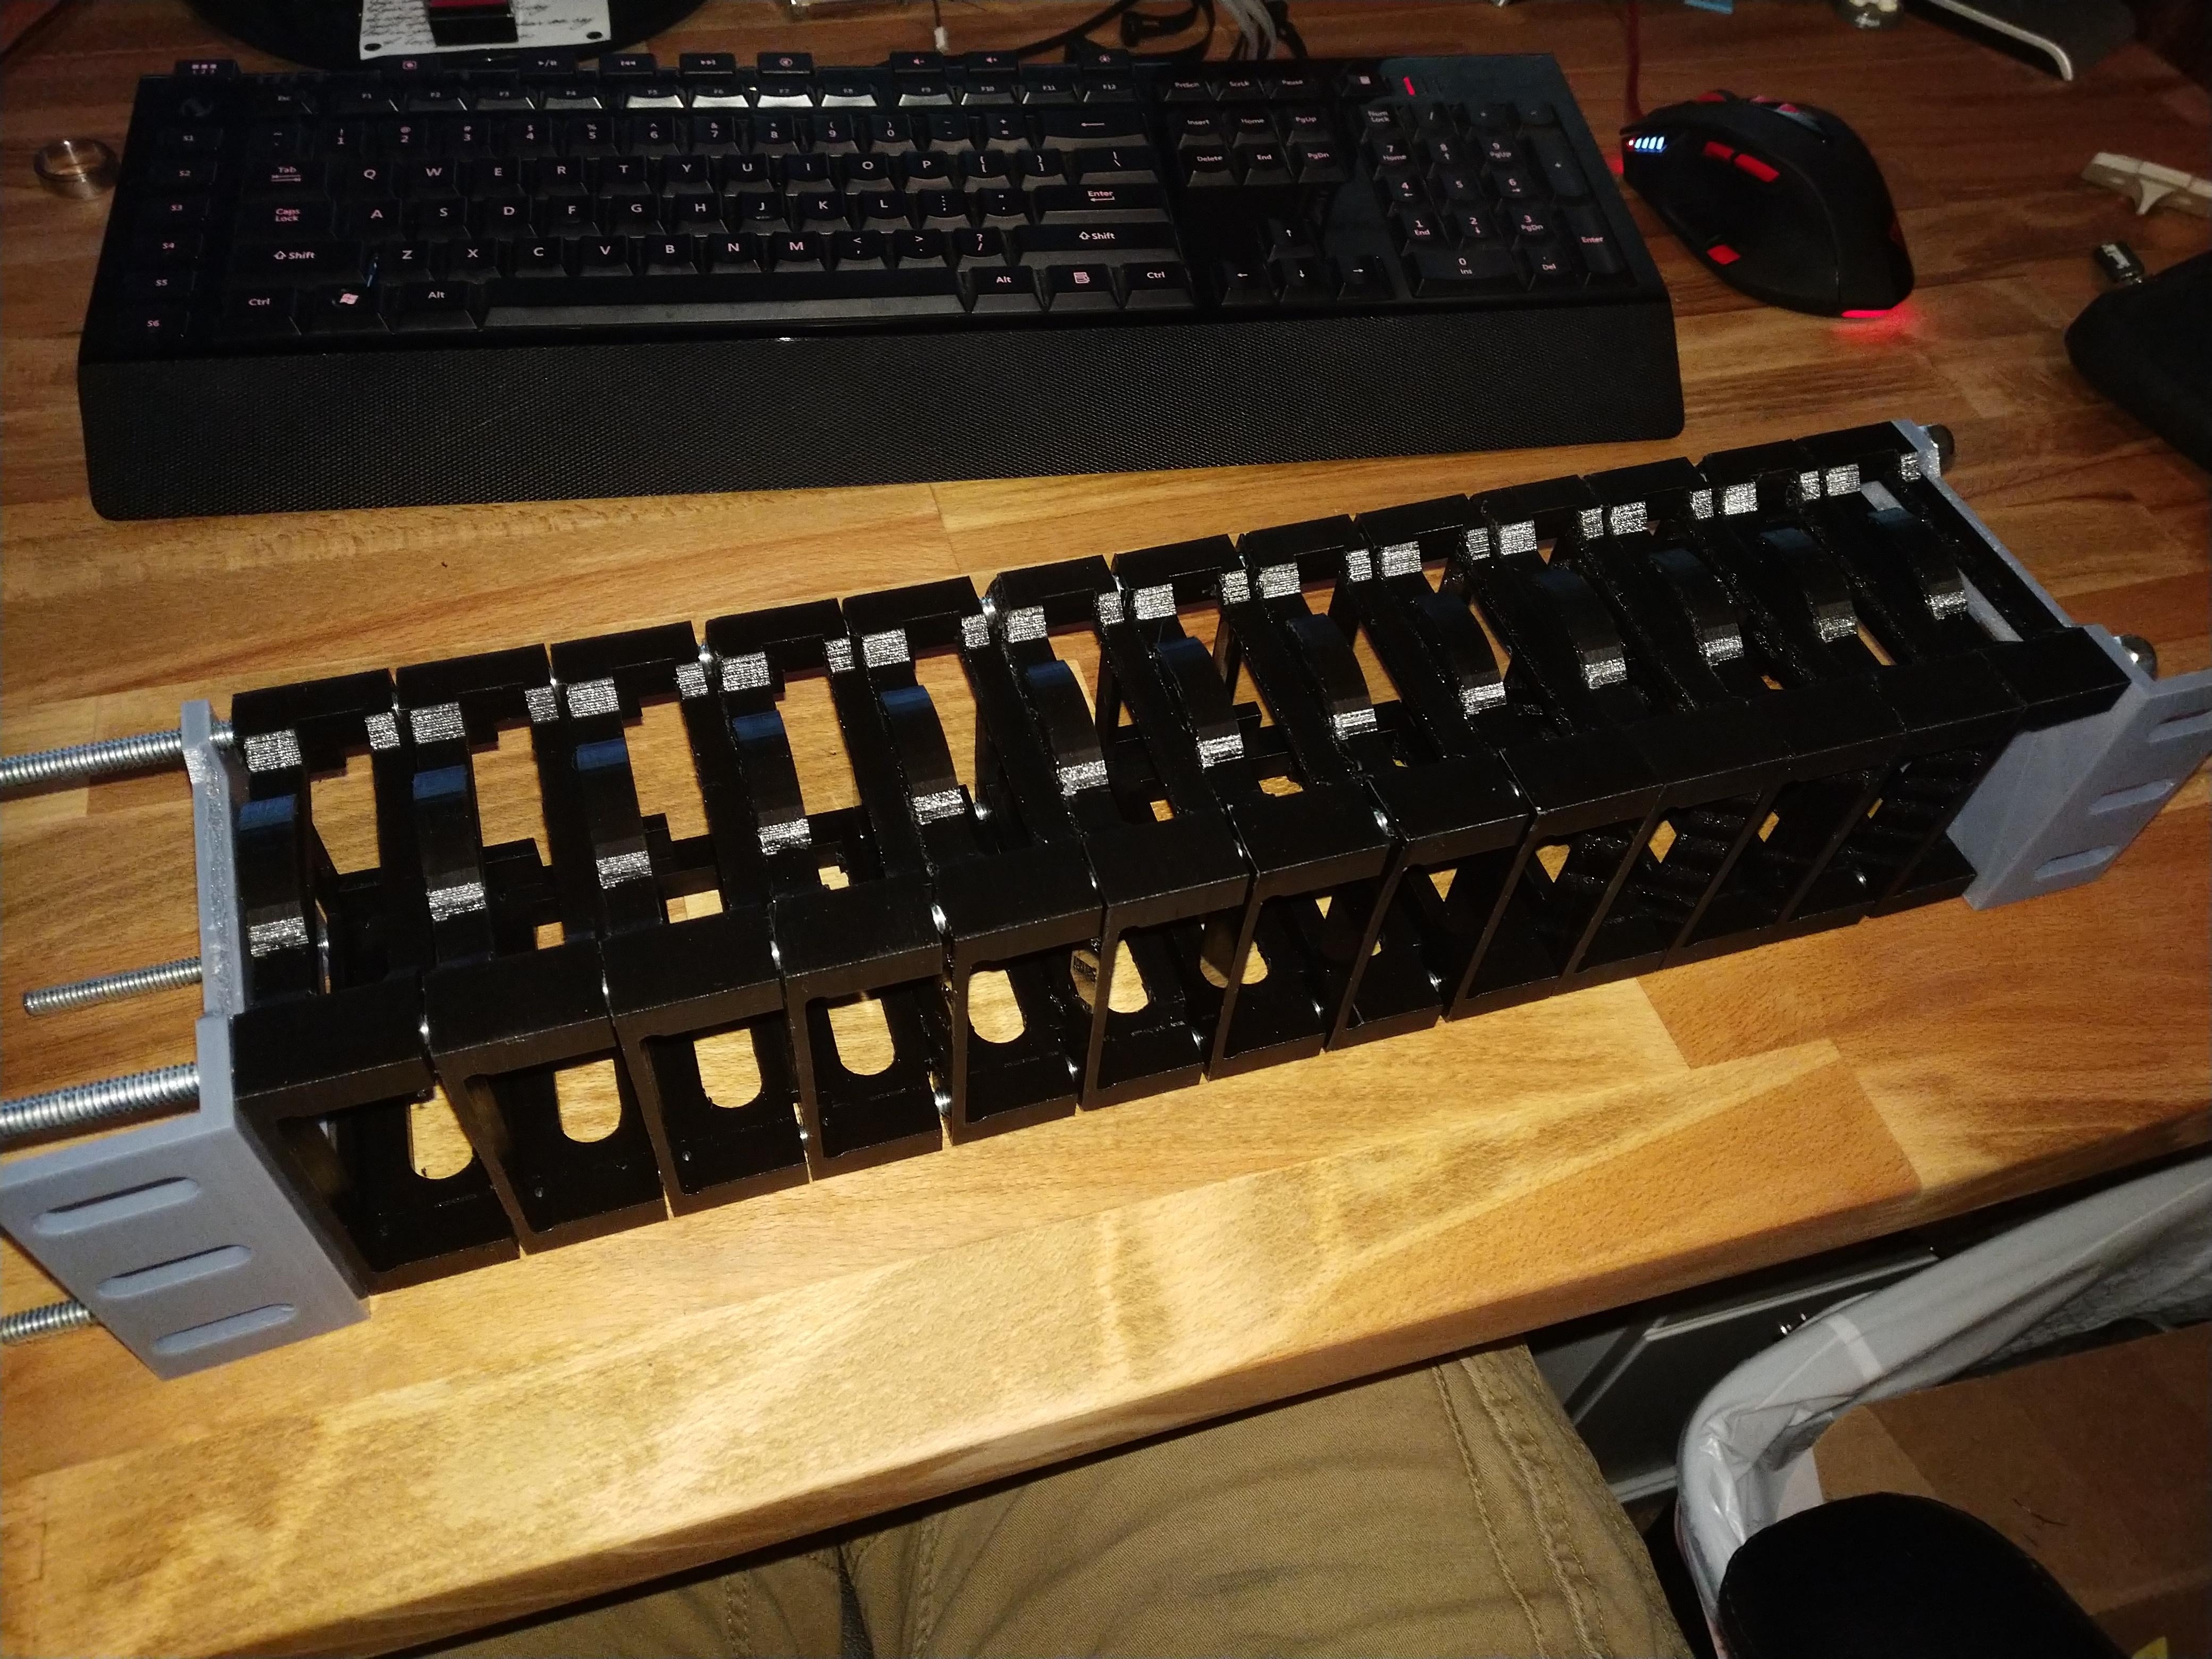
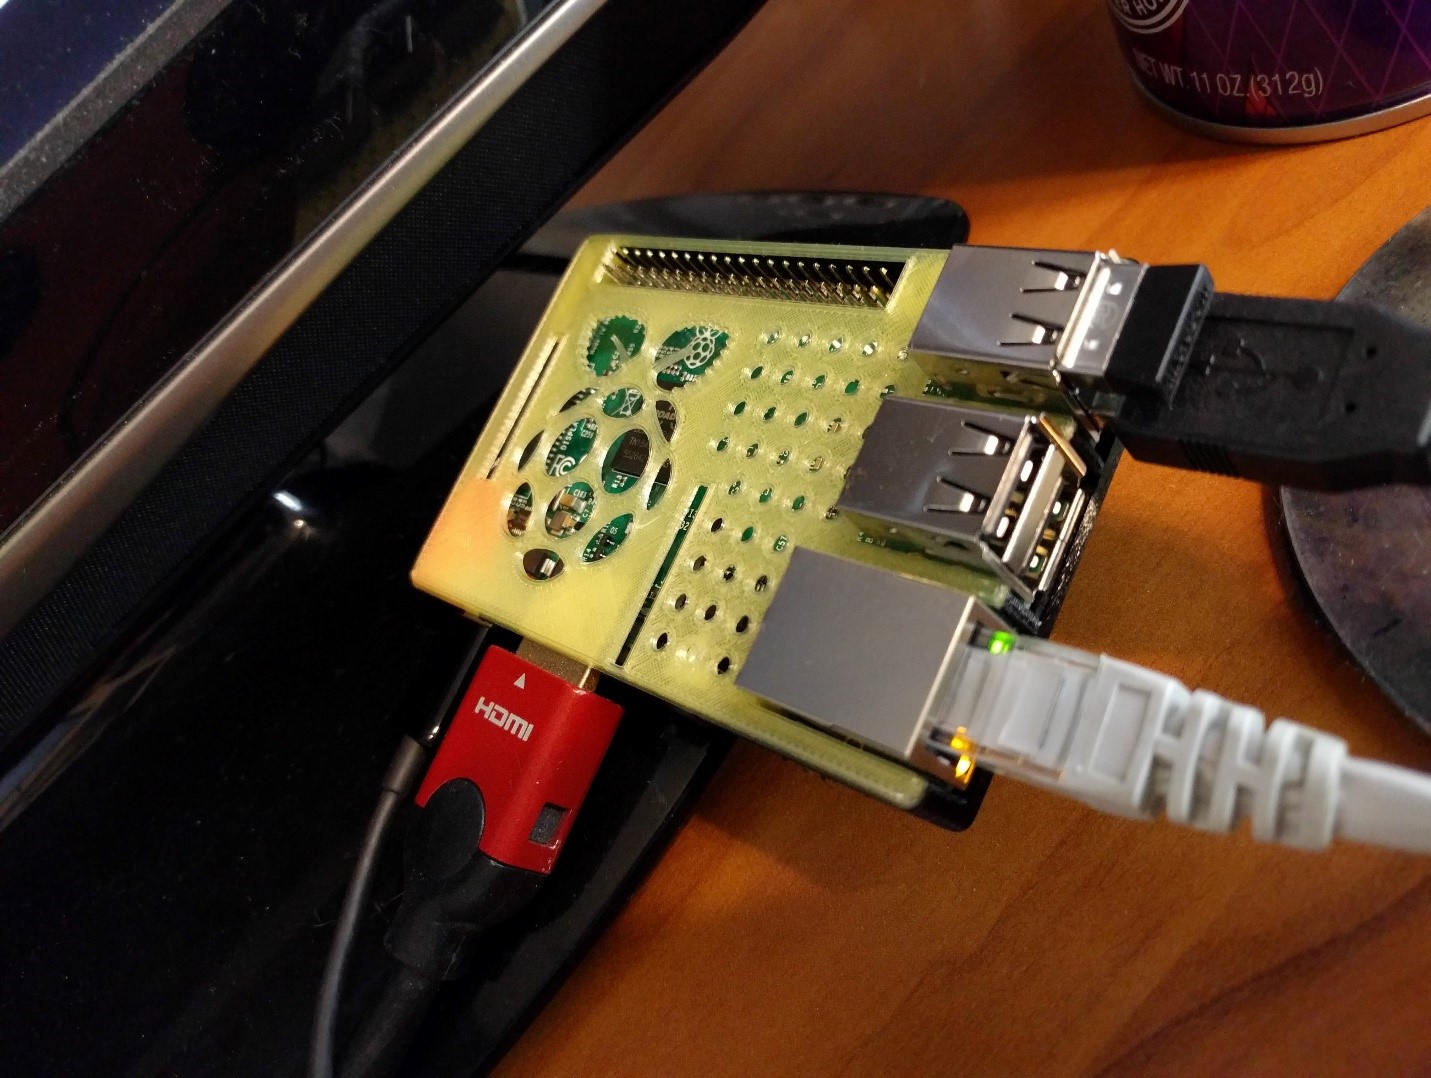
3D Printed RPI Rack
I printed out the Raspberry Pi Blade Center found on thingiverse on my Ultimaker 2. This was a relatively easy set of units to print, with a majority of the time needed on it to be spent cleaning up the large number of pi holders. I assembled these with threaded rods and lock nuts. The threaded rods had to be cut to size but in the end, everything was assembled in about a weekend after printing was done. In order to fit RPI 3B+ with the POE hat, I did end up hand modifying some trays, which I don’t have a model for the changes so they can be printed in that form.
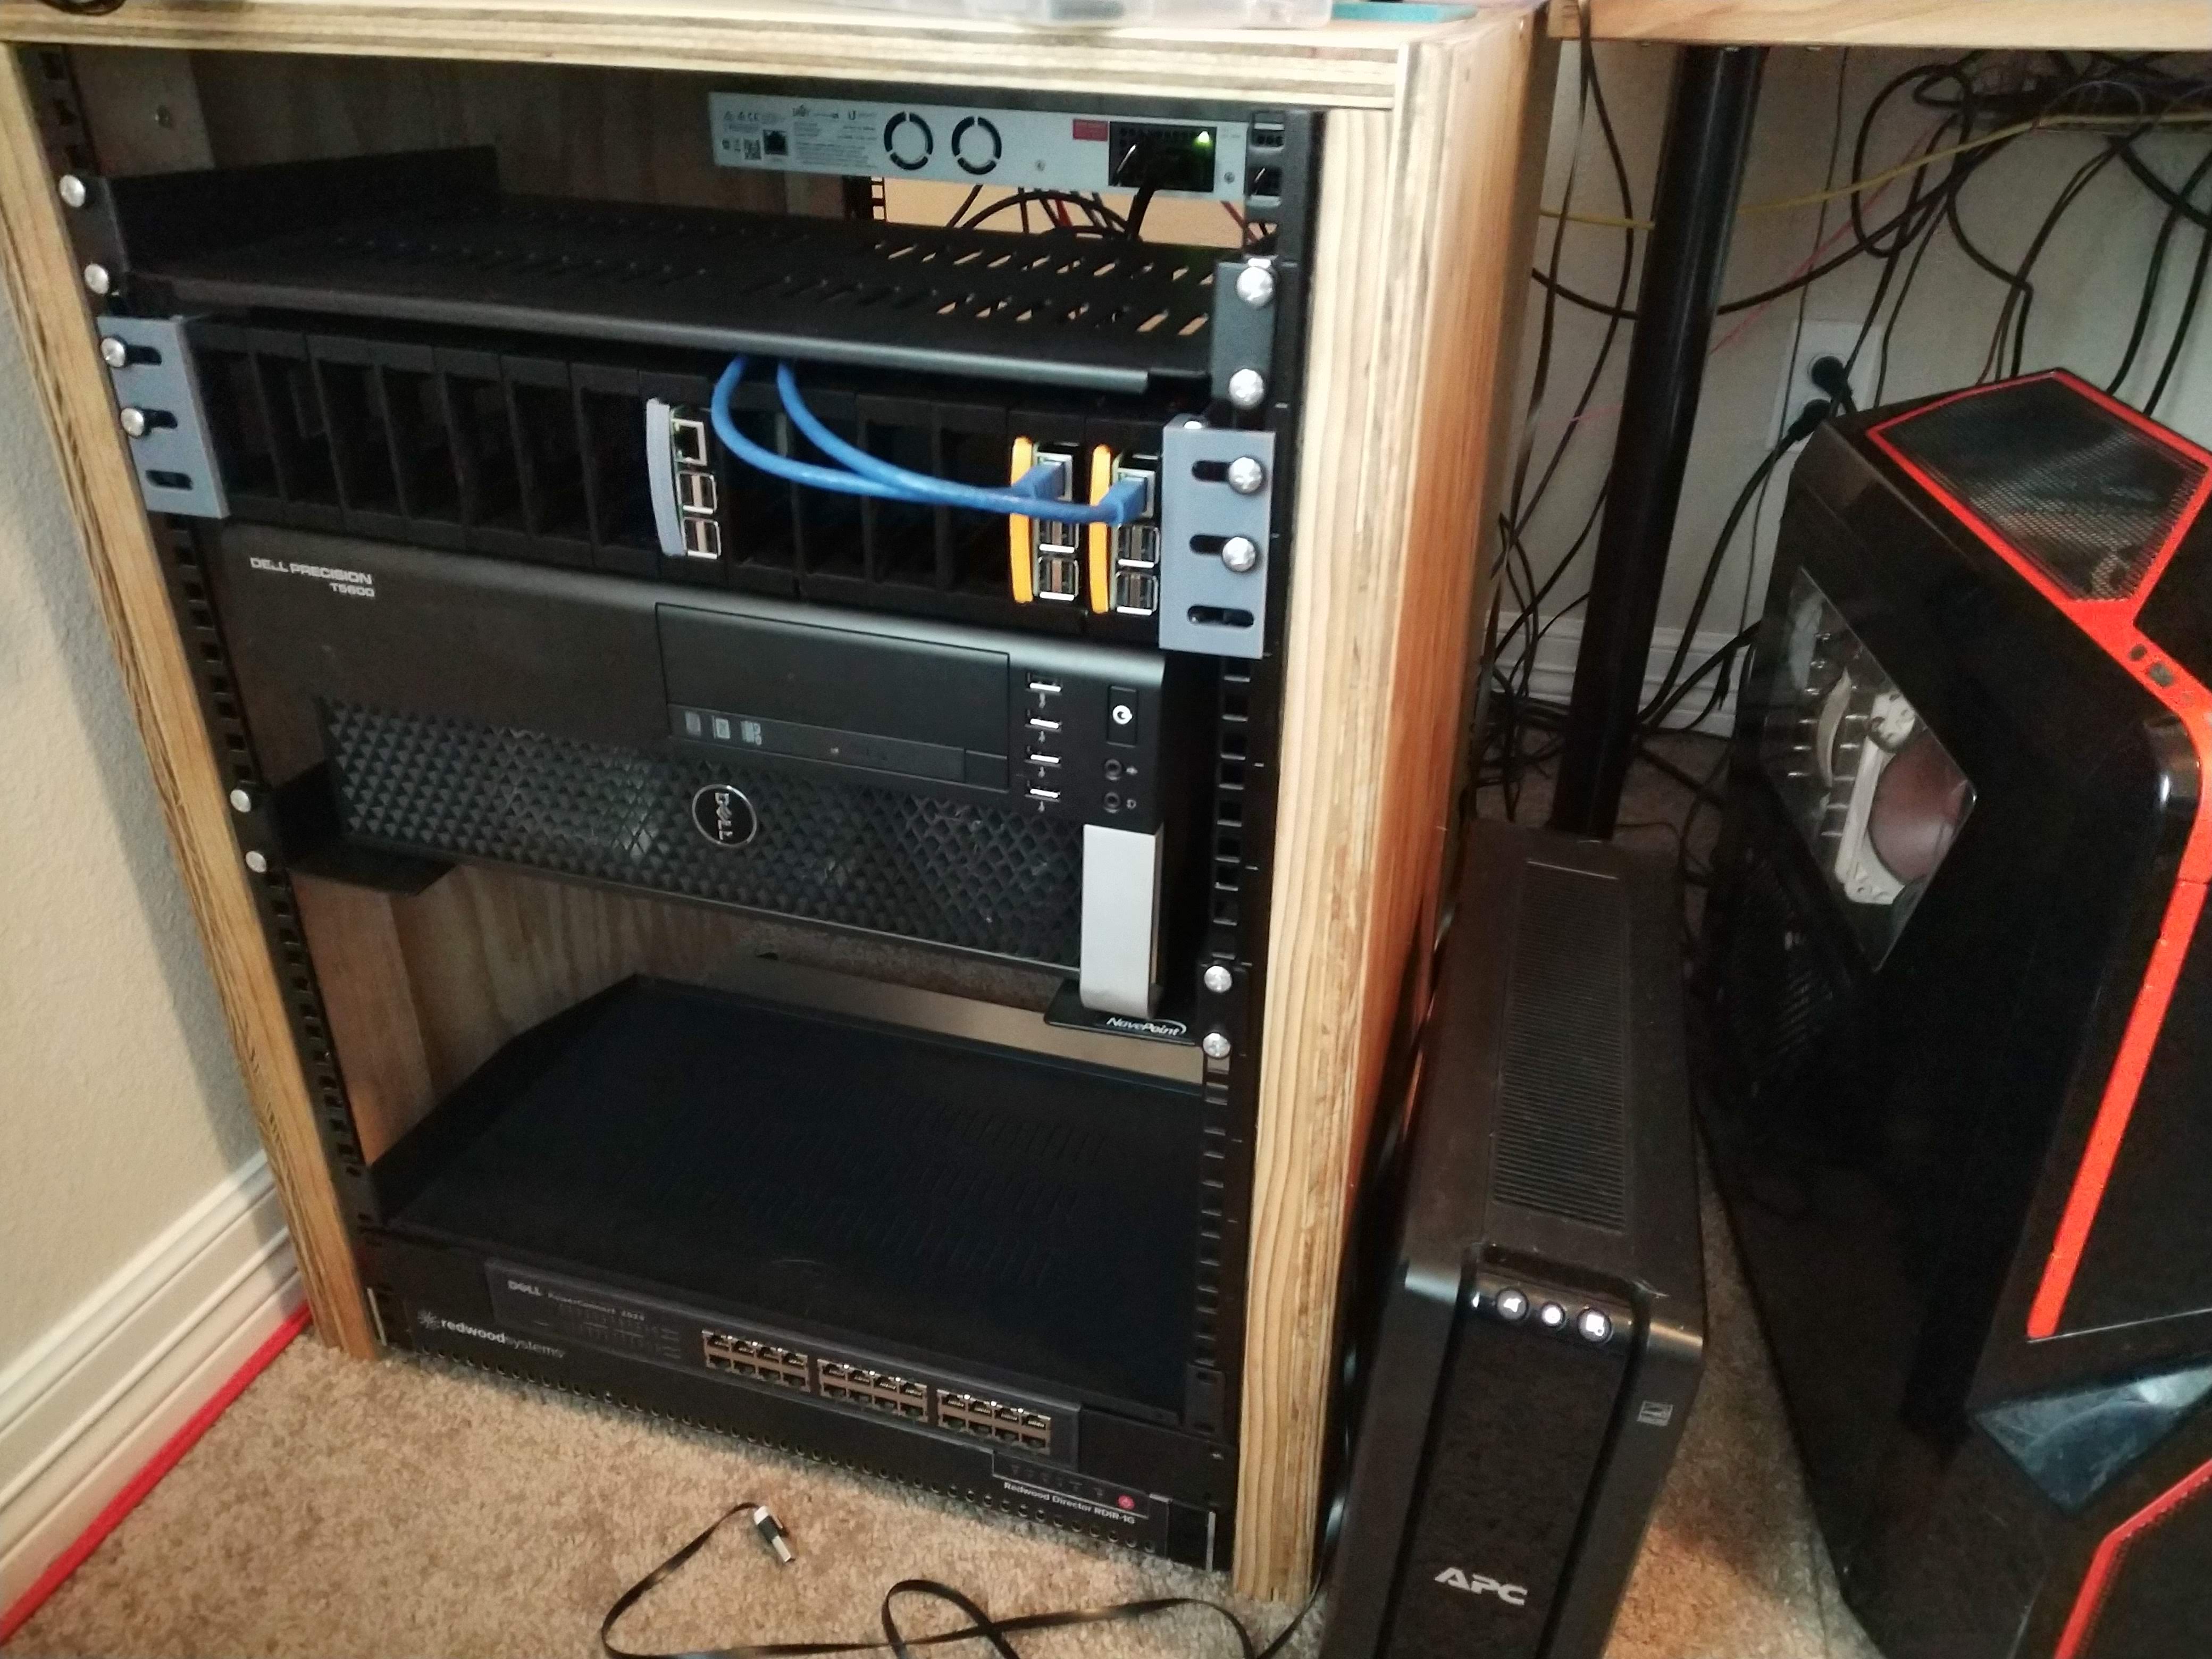
Home Built Server Rack

In order to organize my lab a bit better, I decided to custom build a server rack. This was to be the same height as my desk and also be usable as more work surface area. I determined that a 15u rack would be the the best size, and it would give me some room to grow as well since i only currently have a few things that can fit in the rack (The Fractal Design Define XL R2 is far too big to fit, so its just the vhost, networking equipment and some RPIs). First off, the design, which ended up being slightly incorrect on sizing of one of the components.
Continue reading “Home Built Server Rack”DNS Structure
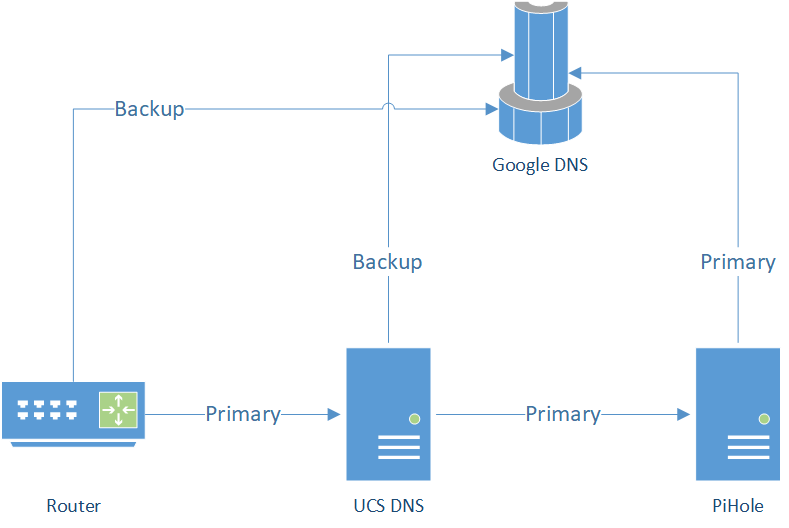
The goal of the DNS structure of my lab was primarily to create a very stable foundation. Second to that, was the addition of two services, the first a local DNS server to avoid loopback issues with my ISP, and the second was pihole ad blocking.
To set this up, UCS was chosen as a domain controller/DNS server over FreeIPA. Linux was chosen as the platform of choice as that is what a majority of my systems are, and I don’t have any windows server licenses. UCS was installed to a VM, and a second ubuntu VM was configured with PiHole. These were configured to handle local queries first, then everything else. If one of my local DNS servers is down, the clients won’t notice a change as everything uses Google DNS as backup.
Installing OctoPi on an RPi
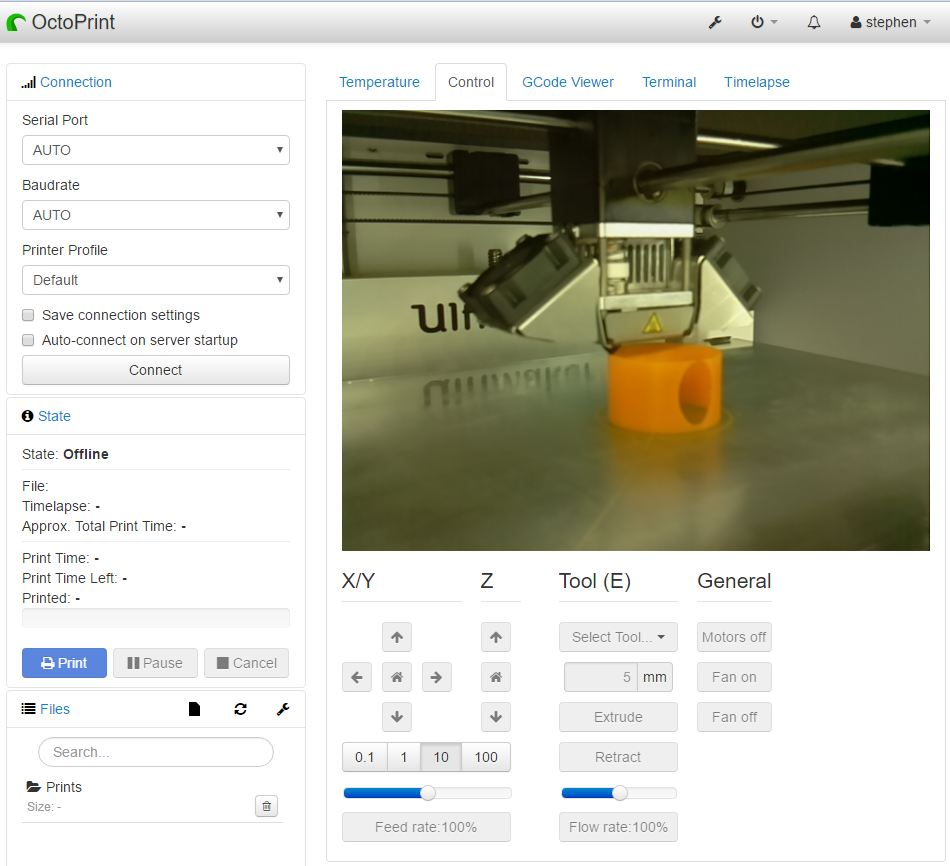
3D printers have come a long ways in the past few years. The prices have plummeted for basic units, allowing anyone to buy them. The raspberry pi can be setup alongside a basic 3D printer to enable some amazing functionality. They can allow remote control, management, and monitoring of the printers. When combined with a pi cam, you can even create time lapses of the prints. To do this, we will be running OctoPi on the raspberry pi.
OctoPi is a Raspberry Pi distribution for 3d printers. Out of the box it includes:
- theOctoPrint host software including all its dependencies and preconfigured with webcam and slicing support,
- mjpg-streamer for live viewing of prints and timelapse video creation with support for USB webcams and the Raspberry Pi camera,
- CuraEngine 15.04 for direct slicing on your Raspberry Pi and
- the LCD app OctoPiPanel plus various scripts to configure supported displays
Installing MotionEyeOS on an RPi
Raspberry Pis are neat little computers that can be placed just about anywhere assuming there is power and network connectivity nearby. These were made even more convenient with the addition of built in Wi-Fi on the Raspberry Pi 3. One application of these small devices is for home security, as a small motion sensing webcam that can record 24/7, or only when there is motion detected.
There are ways to build up your own system using the basic raspbian distribution and various software packages, or you can use a custom built operating system for this purpose, MotionEyeOS.
MotionEyeOS has everything needed to run a security camera system, or simply a remote webcam monitoring system. This will cover setting up a camera in this tutorial for basic recording and monitoring. This will let us spy on our dog while away at work. Continue reading “Installing MotionEyeOS on an RPi”
Network Setup Evolution
The network in the house has never really sat well with me, starting with the pre-installed phone splitter to the gaping hole the contractors left in the wall for the cables. This then comes to a summit since there were NO outlets near the Ethernet for the entire house.
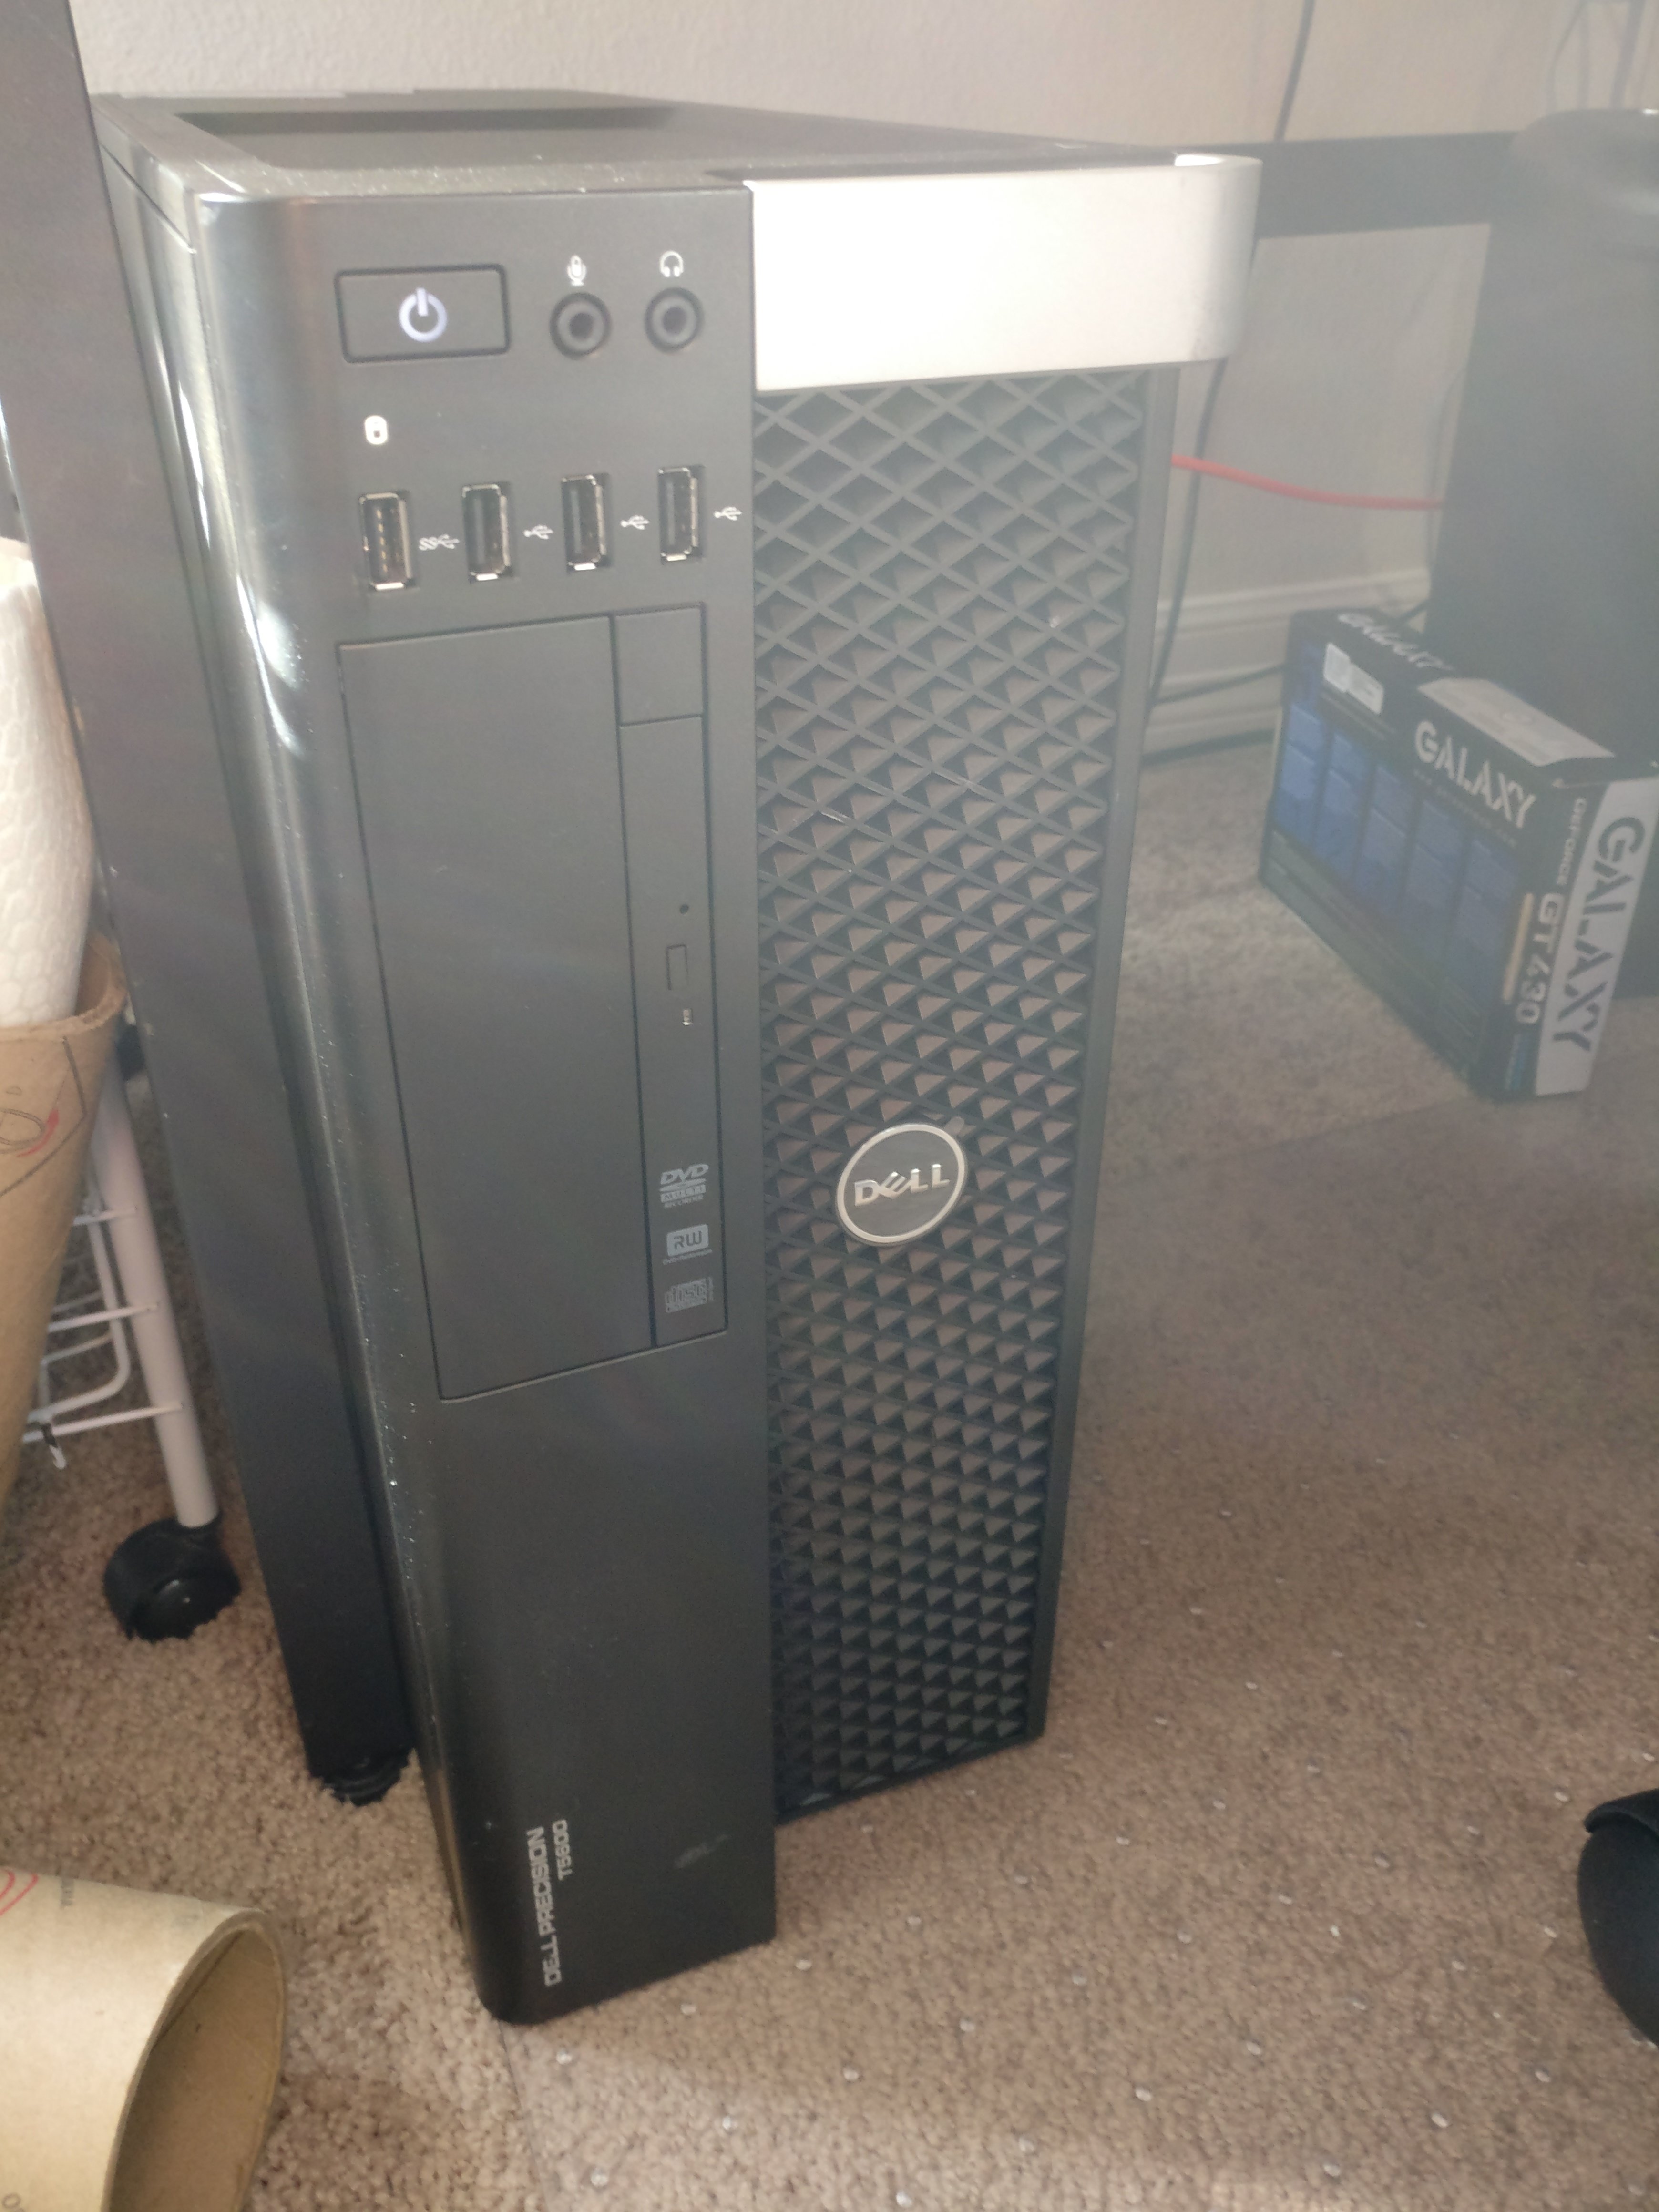
VHost Build
I started looking at servers for a new vhost for a few months, trying to determine what I would need, and what I could utilize. I was running out of RAM in my NAS to run virtual machines, and I was running into odd times when I wanted to reboot my NAS for updates, but didn’t want to reboot my entire lab. So I came to the decision to build a new server that would host the virtual machines that were less reliant on the NAS (IRC bots, websites, wiki pages, etc) as well as other more RAM intensive systems. The new server was to have a large amount of RAM (>32GB maximum), which would give me plenty of room to play. I plan on leaving some services running on the NAS which has plenty of resources to handle a few extra duties like plex, and backups. The new VHost was also to be all flash, the NAS uses a WD black drive as the virtual machine host drive, which ends up slowing down when running updates on multiple machines. I may also in the future upgrade the NAS to a SSD for its cache drive and VM drive.
Here is what I purchased: